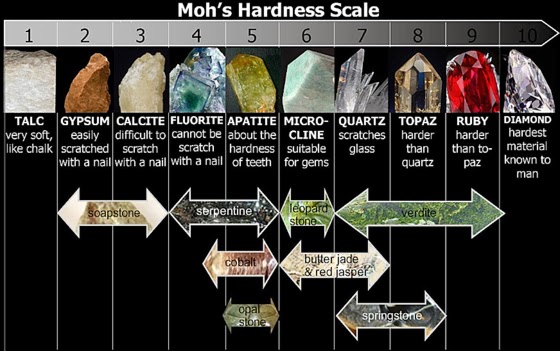
*Information courtesy of www.geologyin.com
What is the Mohs Hardness Scale?
The Mohs scale of mineral hardness characterizes the scratch resistance of various minerals through the ability of a harder material to scratch a softer material. It was created in 1812 by the German geologist and mineralogist Friedrich Mohs and is one of several definitions of hardness in materials science. The method of comparing hardness by seeing which minerals can scratch others, however, is of great antiquity, having been mentioned by Theophrastus in his treatise On Stones, c. 300 BC, followed by Pliny the Elder in his Naturalis Historia, c. 77 AD.
The Mohs scale of mineral hardness is based on the ability of one natural sample of matter to scratch another mineral. The samples of matter used by Mohs are all different minerals. Minerals are pure substances found in nature. Rocks are made up of one or more minerals.
Making Hardness Comparisons
"Hardness" is the resistance of a material to being scratched. The test is conducted by placing a sharp point of one specimen on an unmarked surface of another specimen and attempting to produce a scratch. Here are the four situations that you might observe when comparing the hardness of two specimens
1. If Specimen A can scratch Specimen B, then Specimen A is harder than Specimen B
2. If Specimen A does not scratch Specimen B, then Specimen B is harder than Specimen A
3. If the two specimens are equal in hardness then they will be relatively ineffective at scratching one another. Small scratches might be produced, or it might be difficult to determine if a scratch was produced
4. If Specimen A can be scratched by Specimen B but it can not be scratched by Specimen C, then the hardness of Specimen A is between the hardness of Specimen B and Specimen C.
Hardness Testing Tips
+ A list of minerals in order of hardness can be a handy reference. If you determine that a specimen has a hardness of Mohs 4 you can quickly get a list of potential minerals.
+ Practice and experience will improve your abilities when doing this test. You will become faster and more confident.
+ If the hardness of the unknown specimen is about 5 or less, you should be able to produce a scratch without much exertion. However, if the unknown specimen has a hardness of about 6 or greater, then producing a scratch will require some force. For those specimens, hold the unknown firmly against the table, place the standard specimen against it, press firmly with determination, then holding pressure slowly drag the standard specimen across the surface of the unknown.
+ Don't be fooled by a soft standard specimen producing a mark on a hard unknown. That mark is like what a piece of chalk produces on a blackboard. It will wipe off without leaving a scratch. Wipe your finger across the tested surface. If a scratch was produced there will be a visible groove. If marks wipe away then a scratch was not produced.
+ Some hard materials are also very brittle. If one of your specimens is breaking or crumbling rather than scratching, you will have to be very careful while conducting the test. Testing tiny or granular specimens can be difficult.
+ Some specimens contain impurities. If the results of your test are not visibly conclusive, or if the information from your test does not conform with other properties, do not hesitate to do the test again. It is possible that a small piece of quartz (or another impurity) was embedded in one of your specimens.
+ Don't be wimpy! This is a very common problem. Some people casually rub one specimen back and forth against another and then look for a mark. That is not how the test is done. It is done with a single, determined motion with the goal of cutting a scratch.
+ Be careful. When you hold the unknown specimen against the table, position it so that the known specimen will not be pulled across one of your fingers.
+ This test should be done on a lab table or work bench with a durable surface or a protective covering. Don't do this type of testing on fine furniture.
+ Test tiny particles or grains by placing them between two pieces of an index mineral and scraping them together. If the grains are harder than the index mineral scratches will be produced. If the grains are softer they will smear.
Hardness Variations in a Single Material
Most minerals have a fairly consistent hardness. For example, the hardness of calcite is always about 3. However, some minerals have a range of hardness.
Minerals that are part of a solid solution series can change in hardness as the composition varies. Atomic bonds between some elements are stronger than others. An example is garnet which has a composition of X3Y2(SiO4)3 where X can be Ca, Mg or Fe and Y can be Al, Fe or Cr. Garnets with different compositions have different hardness. Garnets range in hardness from 6.5 to 8.
Minerals such as kyanite have different hardness in different directions. Kyanite is a mineral that frequently occurs in blade-shaped crystals. These crystals have a hardness of about 5 if they are tested parallel to the long axis of the crystal and a hardness of about 7 if they are tested parallel to the short axis of a crystal.
Weathering can also influence the hardness of a mineral. Weathering usually changes a mineral's composition with the weathering product usually softer than the original material. When testing the hardness or streak or other property of a mineral, the best way to test is on a freshly broken surface that has not been exposed to weathering.


